Necessary Mixer Modification
I am the proud owner of a Yamaha GA32/12. I'll have to do a detailed overview of it one day but, for now, it lives under a bed at my parents' house while I make my way through college. A genuine tragedy.
My journey to owning this thing started probably five or six years ago, in probably my junior year of high school (or so). The group of guys I had put together to be my church's youth band ended up being a phenomenal group. I'll never get over how fun it was to play with those guys and the four (and sometimes more) of us were pretty confident we would be able to be a full-time worship band. Well, life happens and that just didn't play out.
But, all that to say, I wanted us to be able to control our own mixes from the stage with our own equipment. So my idea was to split the output of every instrument; one send to the front of house, and one to our monitoring system. Terribly inefficient, I know, but I've learned a lot since then! So I concluded that what I needed was a mixer with a bunch of inputs and a bunch of bus outputs.
Lo and behold, a former youth pastor sent me a picture of a behemoth sitting under a pool table at his new church and told me I could buy it if I wanted. I think I paid $300 for the thing, though I don't remember for sure.
Unfortunately, I was never able to use it as the monitor mixer like I wanted. But, I do use it whenever I am asked to run sound for various large events. This board has run a variety of graduations, Fourth of July celebrations, and probably some other things I can't think of. My bandmates and I, quite appropriately, named it The Beast.
However, the best way I could find to load it in my truck (and without putting it in the bed in case it decided to rain) was to lay it on the back I/O plate and slide it in. This isn't a problem when theres no attached power cable; but there is. And I guess in fairness, Yamaha probably didn't expect this thing to get lugged around like I do. But still, an attached power cord on something like this is lame.

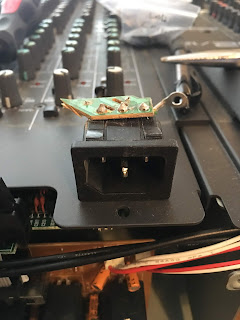 I found one of these computer power cable connectors in some old computer power supply. So, I unceremoniously ripped it out and cut a hole in the back plate where the power cable had been to fit it.
 From there I just had to solder it to the same places the original power cable was an voila! I feel much safer lugging this thing around now.

My journey to owning this thing started probably five or six years ago, in probably my junior year of high school (or so). The group of guys I had put together to be my church's youth band ended up being a phenomenal group. I'll never get over how fun it was to play with those guys and the four (and sometimes more) of us were pretty confident we would be able to be a full-time worship band. Well, life happens and that just didn't play out.
But, all that to say, I wanted us to be able to control our own mixes from the stage with our own equipment. So my idea was to split the output of every instrument; one send to the front of house, and one to our monitoring system. Terribly inefficient, I know, but I've learned a lot since then! So I concluded that what I needed was a mixer with a bunch of inputs and a bunch of bus outputs.
Lo and behold, a former youth pastor sent me a picture of a behemoth sitting under a pool table at his new church and told me I could buy it if I wanted. I think I paid $300 for the thing, though I don't remember for sure.
Unfortunately, I was never able to use it as the monitor mixer like I wanted. But, I do use it whenever I am asked to run sound for various large events. This board has run a variety of graduations, Fourth of July celebrations, and probably some other things I can't think of. My bandmates and I, quite appropriately, named it The Beast.
However, the best way I could find to load it in my truck (and without putting it in the bed in case it decided to rain) was to lay it on the back I/O plate and slide it in. This isn't a problem when theres no attached power cable; but there is. And I guess in fairness, Yamaha probably didn't expect this thing to get lugged around like I do. But still, an attached power cord on something like this is lame.

So, probably two or so years ago, I decided to make the cable removable. I must've spent two hours just removing the 88 nuts and 148 screws but this was the ultimate result. I had wanted to check on a few other things while I had the unit open but, once I saw how dense the internals were, I decided to just stick with my power cable goal.


Comments
Post a Comment